How To Buy a Domain Name from Namecheap in 4 Steps
-
 Phil Wilson
- Updated on August 29, 2022

If you are in the market for a new domain name, but trying to find out what is the best way to do it? This guide on how to buy a domain name from Namecheap will walk you through the exact steps.
When I have a new business idea, the first thing I think of is potential names I could use for the brand. While having a great domain and brand name isn’t always necessary, it’s a good way to build trust with your audience as well as describing what your business is about.
One thing I often see people struggle with is finding the right domain name for their new brand, or have issues finding the right domain registrar. Luckily, I’ve gone through this hundreds of times and in this guide, I’ll show you how to find available domain names, and how to buy a domain name from Namecheap. The best part is, you can get a new domain from just $0.98!
What is a Domain Name?
To ensure we are on the same page before we go through the steps on how to buy a domain name, first I’ll explain to you what a domain name actually is.
There are many ways to explain it, but I’ll get a little creative on how you could visualise it.
Imagine you are building a new physical store, you’re going to need a location to build your structure. A domain name is like an address as you choose where you want it to be built by choosing a domain name, and then you have the ability to build on that address. It’s also sometimes visualised as a plot of land and just like in the real world, only one person can own the land at one time.
Some people often mistake a domain name as a website, but building a website is a little different. Think of a website as your store structure, and to build the structure on your address, you’re going to need foundations. The foundations for building a website are called web hosting platforms, and there you can link your domain name and start building your website.
4 Steps on How to Buy a Domain
I’ve broken down the domain buying process into 4 simple steps. If you follow these, you should be able to find the best domain for your new brand or website. You’ll also see the is branding opportunities on social media platforms, and you’ll have access to your domain dashboard.
Finding a Domain Name
This step is most likely the one that will take the longest. You may have a name you really love and want, but when you go to search the domain availability, someone else may have it. There are a few ways we can find similar domains however, so let’s dig into the process.
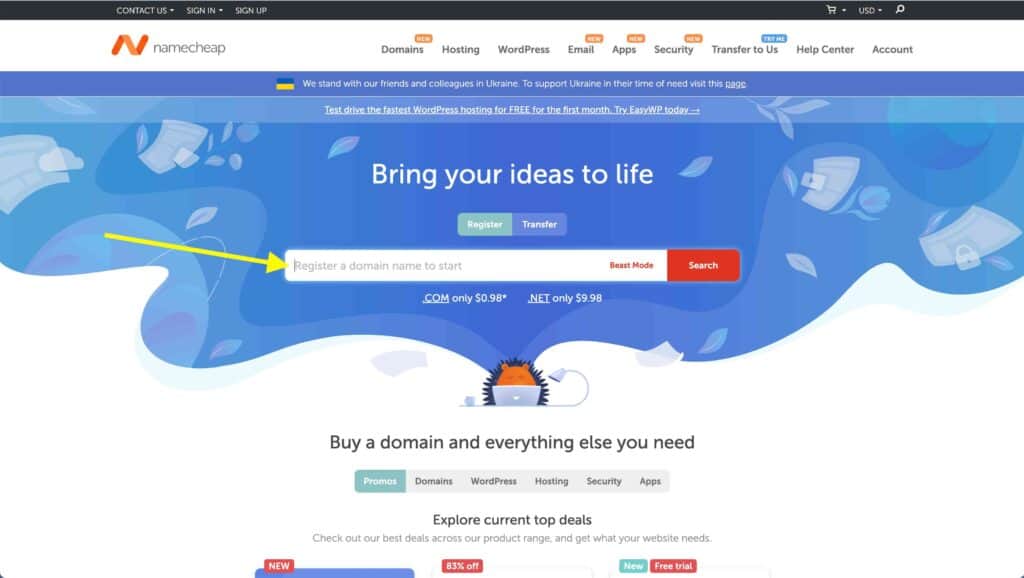
You first want to go to Namecheap and in the search bar, type in your desired domain name.
Ideally you want to get a .com, but if it’s not available, other popular ones include .co or .net. If you have found one that suits, simply “click on add” to cart and follow the next steps.
If your domain isn't available
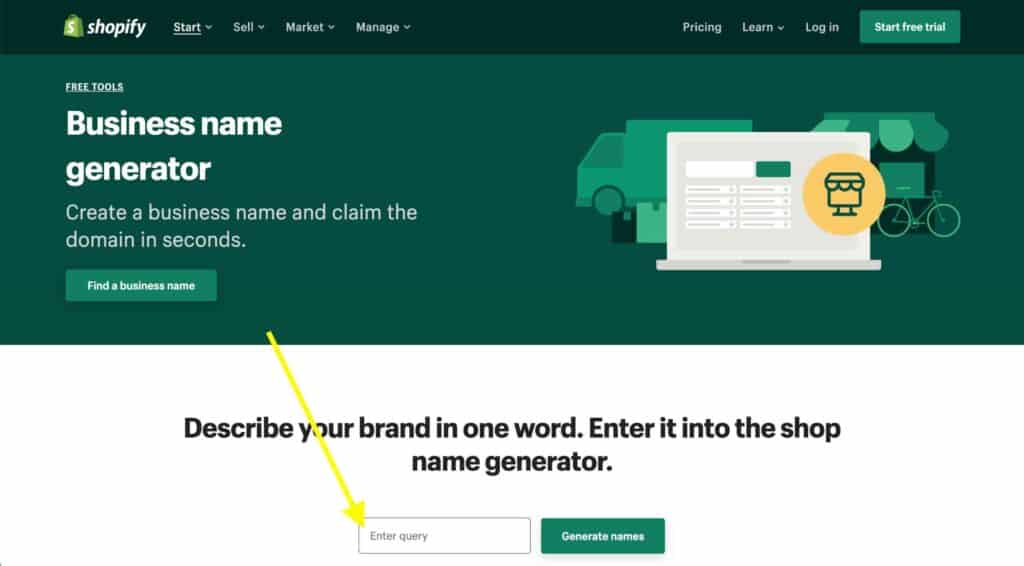
If the domain name is taken, then the next step is to find similar domain names. Two websites I often use are the Shopify Business Name Generator and Business Name Generator. These two sites allow you to add in a single word, and it’ll find relevant available domains with the keywords included.
Once you have found a domain that could suit your brand in those websites, go back to Namecheap and enter in your new domain idea. As I mentioned earlier, finding the right domain name can take some time, but it’ll be worth it once you find the right one.
Do note, if you decide to buy the domains from the two websites above, you will pay more for your domain purchase, that is why it’s best to use Namecheap as your domain registrar.
Another tool I use is NameChekr. This allows you to see the availability of social media handles for your desired name. Using this tool also helps with the domain buying decision, as if all names are taken, perhaps it might not be the right fit if you want to use social media.
Upsells and Domain Protection
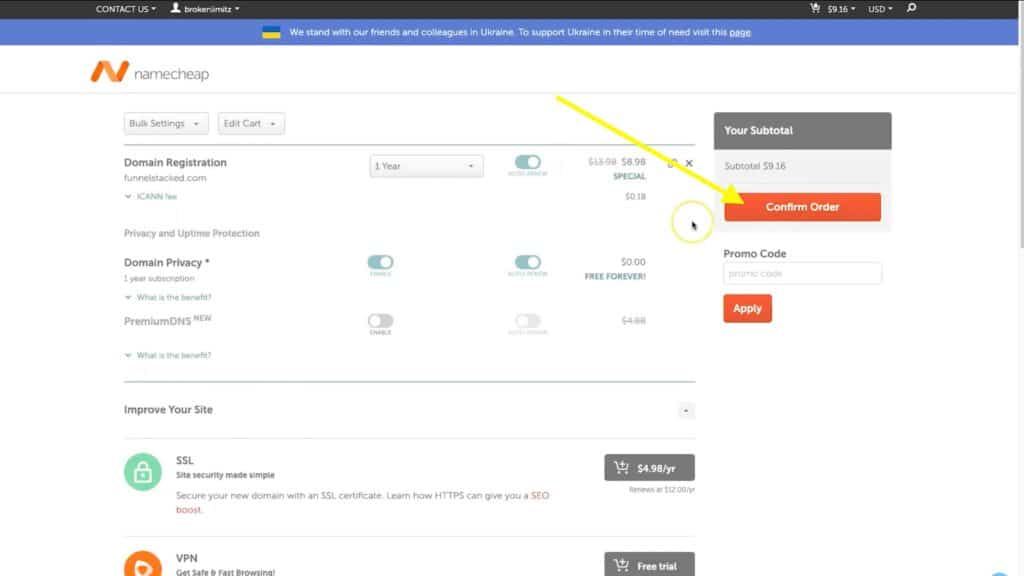
After adding the domain to your cart and going to the checkout, you’ll notice you are brought to a page which offers ways to “Improve Your Site”. Don’t be fooled by the free trials or discounted offers, there’s a really good chance you don’t need anything additionally.
You’ll notice the two most important things are already in your cart, which is your domain name and the Domain Privacy which comes free with Namecheap.
There is also a section for Promo Codes on the right. If this is your first time with Namecheap, you’ll get the best promo code available added to your cart.
However, if you’ve used the code before, then I suggest adding in a chrome extension called Honey. This finds the best discount codes on the internet and cycles through them to get you the cheapest rate.
Once you are happy with your checkout cart, click on Confirm Order.
Buying the Domain
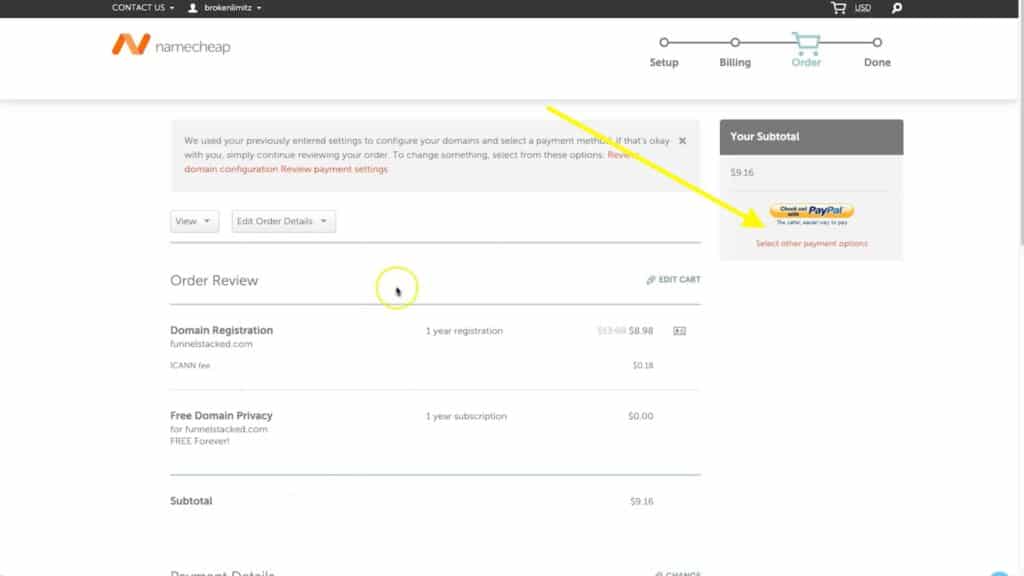
You’ll next be redirect to an Order Review page. This will be the last step which is payment before getting access to your new domain name.
On the right, you can choose your default payment method you entered when signing up, or you can add one on the fly.
Once you have chosen your payment method, entered in all the necessary fields and clicked on purchase, you will then be redirected to Purchase Summary page, and you’ll now own the domain.
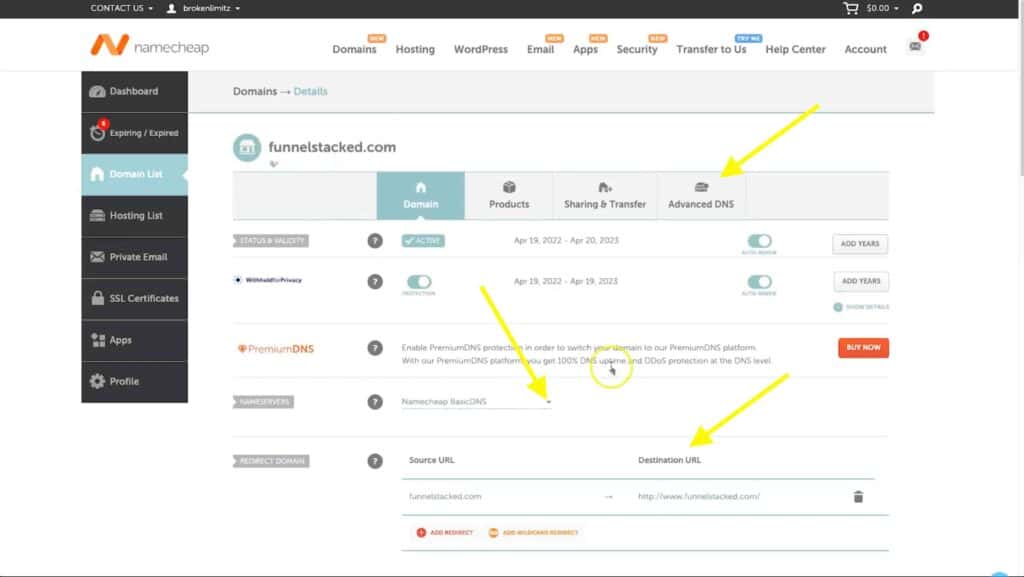
To use your domain, click on the Manage button and you’ll be redirected to your new domain’s dashboard.
Managing the Domain
Building Websites with Web Hosting (nameservers)
The most common thing I do with my domain names is built websites with them. To achieve this, you want to find the NameServers of your web hosting company, and scroll down to the NameServers section.
Once you’re there, simply click on the drop down menu and choose “Custom NameServers” then add in your web hosting companies NameServer records they provide you.
Once added, click on the green tick button to the right, and you’re done!
This process can take up to 24 hours to move over to the new records, however it usually only takes about 30 minutes.
Redirect To Another URL
Sometimes, I want to use the domain name as a simple redirect. This means, if anyone types in my domain name URL, they will be redirected to the destination of my choice. This is perfect for different marketing campaigns or even affiliate marketing, depending on your needs.
Use for a Third-Party Software (DNS Records)
The other option I use for domain names, is for when I want to add them to third-party software like Systeme.io. As the platform is an all in one marketing platform, it requires you to add in CNAME records to link the domain to their platform.
Once added, you can then control the domain and future pages, from the third-party platform.
Final Thoughts on Buying Domains
There’s a good chance this won’t be the only time you buy a domain name, so don’t freak out if you choose a name you’re not happy with. You also get a 3-day refund period with Namecheap, so if you purchase a domain and then the next day hate the name, simply reach out to support and they’ll help issue you that refund.
I hope you’ve enjoyed these steps on how to buy a domain name from Namecheap. If you have any questions or feedback, I’d love to hear down below in the comments!
